I would have
to say that the Bergepanther has grabbed my utmost attention over the last 15
years. I found that this armored maintenance vehicle was an achievement of
engineering. Once all the teething issues with initial production vehicles were
sorted out it wasn’t too long after when Panthers were converted to recovery
vehicles. The different versions, from simple towing vehicles to the marvels of
the 40 ton winch and spade on latter models of Ausf. A and Ausf. G.
An extensive
list of units received Bergepanther’s during the war, from the Eastern front,
Italy and the Western Front. An impressive number were built from May 1943 till
March of 1945. Bergepanther production was completed by WaA {Daimler-Benz},
M.N.H, M.A.N. and Henschel. With 677 production models and 57 repaired or
converted from Panther tanks. A large extensive list of “mods’ were performed
during its short life with many upgrades, including the 2 CM KwK gun with
shield , 40 T Sielwinde { winch} Hebebaum { jib crane } , Abstutzsporn { Spade}
and Anhangerkupplung { tow coupling } . Additional fuel tanks and extra seating
for more crew was required to man the recovery AFV.
We as
modellers have had to lust for the elusive model in styrene for some time, looking
for the “holy grail” of Bergepanther’s.
Just think at one time it was rumoured that Dragon would do this kit,
but I think that’s a pipe dream. We have an abundance of masters model the
“Berge” over the years from Tony Greenland, Steve van Beveren and lately Phil
Stutcinskas. Most have done extensive scratch building and loads of research to
present these marvels to the public. Hopefully I can present one near as good.
There is the Italeri kit that was still
available and I have to admit I built a long time ago but it is simple in its
details and the layout is missing a lot of internal pieces. The transmission
area is very lackluster and simplified. With the inaccuracies I didn’t feel I
could do any justice and make a proper vehicle. There is the Verlinden upgrade
kit but reviews online have been less than stellar. I saved myself the anguish
in buying this kit.


I had purchased the On Track conversion set for the Tamiya G kit years ago on the Evil Bay for a great price. They were hard to find and when an auction came up they usually got snagged for a lofty sum.

I believe this kit was mastered by Tony Greenland years ago, and the original build can be found in Model Fibel Panther book dated back in 1995.
The On Track kit looked very intimidating at the time of purchase with large cast blocks to saw off and the instructions were rudimentary in scope and seemed like there were doodled on a napkin. So off to the shelf to sit for a decade or more, forgotten amongst the other kits that seemed too taxing or time consuming. Don’t get me wrong some parts of the kit still stand the test of time like the winch and spade. But it is a mix of inaccuracies where some pieces were only seen on the Ausf. A model.

A hodgepodge of the Verlinden and On Track set. This is a mixed bag of resin. Shale I commence an elaborate build with a great deal of scratch building? Wait do we have enough reference material? Shale I do a Ausf. G or A? Do we have accurate reference material other than scale drawings, how about some extensive history? Too many questionable variables to proceed.
Then it happened, the stars lined up, the modeling gods spoke; someone listened. I wanted to do this kit some justice and now we have the chance. First off we had the release of Panzer Tracks No 16-1 Bergepanther Ausf. D .A and G. The reference if one of the best for anyone that is looking to do any version. Well written and shows the history and mods required for each version. For those with the nerve to scratch build, there are an abundance of 1/35 scale drawings of all four views with and without the Ladebruke. { You can look that one up ? }

Lots to cover in this extensive publication. The mods abound with variations between the different manufactures of the elusive beast. Development and final assembly between M.A.N. , Henschel , Krupp , M.N.H, Daimler Benz , and Demag. It was a very interesting read, a “have” if one it to build any variation.
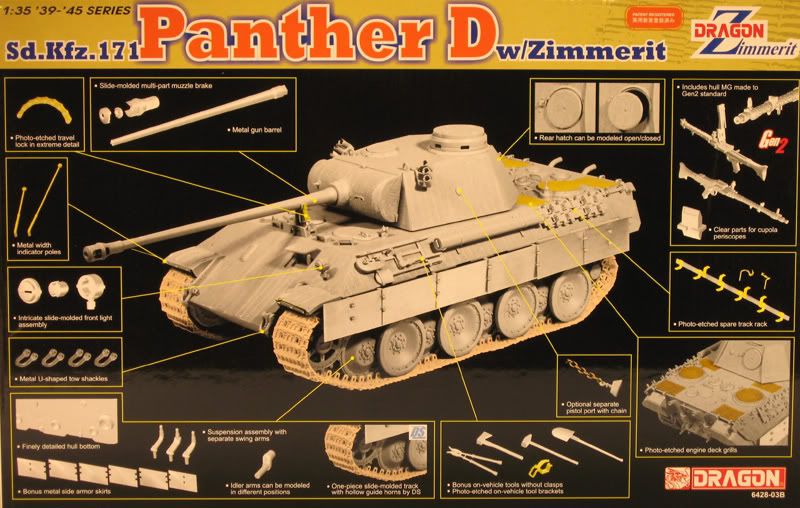
A choice Panther kit from Dragon to do the conversion {lots to choose from} . Some photoetch {lots to choose from again} and aftermarket goodies. I chose the Dragon Kit {Cyber Hobby Late A} which you can easy convert to an early A and has the non- fixed suspension. An important feature since the vehicle wasn’t nose heavy. I got this thru our local hobby shop for a song and I liked the added bonus of the figures included. If you can find the premium kit from Dragon, scoop it up for it’s hard to find and has lots of added goodies. Easy kit to convert to an early A due to the different pieces of the front hull included.

Find the premium kit from Dragon, scoop it up for it’s hard to find and has lots of added goodies. Or the Panther D kit posted below for early versions.
The missing piece of the puzzle.
I could go in many different directions, use the CMK, Verlinden, or Royal Model interior kits and convert what pieces I needed to change. Reading reviews on line about the extensive conversion kit from Tiger Models Design, this looked like it was the kit to be “had” and the only extensive conversion out there for this vehicles. This looked awesome but the overall price of 150 USD looked a little far in reach when doing conversion into CDN dollars. Then luck struck. The Canuck dollar was above par with the US buck and TMD had a sale for 20% off. Now that would be my good fortune in a price point for the build.

Off to the site to order the extensive resin conversion. While waiting for the pending arrival, I downloaded the pdf file for the instructions from the site. Wow, lots of work went into this kit.

A few pictures from the TMD site to show off the work involved in putting this together.

I have to note that this is Early A Bergepanther conversion so do your research if you plan on building another model. This one has the early spade and the early tow point seen on the preproduction model. The instructions are peppered with humor and warnings throughout. Again I have to hand it to Joe Bakanovic for laying out the instructions in an easy to follow form. There are 28 different areas of the build from the hull subfloor to the crane. The pictures are a little light for printing but you can go to the preproduction build on Track Link. The address is as follows http://www.track-link.com/forums/site_blogs/10417/flat. William Bradley does a great build and you can see it in progression.
Box of goodies unpacked into a kit lid.
Box of goodies unpacked into a kit lid.

Picture below of the TMD hull insert next to the Verlinden offering. Comparison between the two , you can see the true masterpiece in casting.

Progression on the hull floor and sponson sides.


Alignment , measure , measure again , align and finely glue.

Some paint taking place.


More progression on the transmission and front end.


Final build of the suspension greasing points.


Some components constructed and painted separately before finally assemble.


Interior coming together.

A lived in looking interior .


Components complete and painting 90% done .

Just have to wire up the batteries , these will be added once the winch is completed.


Some of the front end plumbing was left off due to fit issues and areas that would never see the sun again when the top of the hull is attached.


To summarize the interior build , check you references and measure , measure again , double check the instructions a number of times and proceed methodically. This is not a "shake and bake" build by any means . Lots of refinement is needed in many areas. Some parts can be warped or have some casting slag. Most of my kits interior bits were flash free and the only problematic area was the main bulkhead. It had a mind of it's own and would not sit flush or square so some surgery was needed to make it sit right. Make sure the sponson { fender floor } are square at a 90 degree or you will have problems. Before putting paint on , think of the time frame your Panther was built. Was is a rebuild , or factory finished. One can go a little nuts doing all the plumbing for the transmission and braking system , but most is not seen. If your in for a marathon or you want to see the finish line some day before you go down this avenue.
Stay tuned for part 2
Amaizing work Cary, I stay tuned to follow the next posts.
ReplyDeleteHi Gary, there is much to learn here. You're doing a super job of detail, which few can do. I look forward to the next step.
ReplyDeleteHappy Holidays.
Loris
Thanks ,and happy holidays to everyone.
ReplyDeleteI just found your Bergepanther blog and have to say it's amazing, in hindsight would you make any alterations to your original model now that further Bergepanther kits have been added by other model manufacturers ?
ReplyDeleteHi Dan , sorry for the late response. The Takom kit is a copy of the Tiger Models kit . They worked in conjuction with them on all the interior for their molds. I'm sure the new kits are less labour intensive , you don't have to cut off casting bloks etc.
ReplyDelete